
Long standing alliances 🤣🤣🤣🤣🤣
Yeah I am waiting for this too, get on it devs!
Nah, actually good old XMPP - which makes me happy as it works so darn well
Keep being facetious.
This looks promising


That's where parenting comes in.
Be present in your child's life, don't just leave them on their computers. I mean really, have some darn responsibility.
Silk Road or not.
Imagine you started a family on a piece of land of which you have a valid title deed to. You got there and nobody else was there - no prior title deeds/valid claimants existed. So, you get to work. You setup chicken wire around a portion of it for a coup. Maybe grow a vegetable patch; up to you. You then placed a little fence around it indicating where your property begins and ends.
It's all very physical, easy to determine and to prove.
Now imagine, that somebody comes and destroys it, bombs it, brings armed thugs to move you out of it. All whilst you had a valid claim to that particular plot of land (nothing more and nothing less than this fenced-off area).
It's incredibly disturbing to see daily the ways people will justify the destruction of private property (and very well the lives of those living in said property at the time of its destruction). Some will dream up nationalistic tripe about "our land", some will claim "but b...ut but we paid them market value" (whilst they hold an effective gun to your head - coercing you to sell it off), some will say "we'll move them to better housing" (after bulldozing their house).
Liberty doesn't have a skin color preference. Private property is an inherent right to all, doesn't matter where in the world you are and what religion you follow, race or sex. Once you understand this pillar of peaceful coexistence you will see the so-called rulers for what they are - envious heathens; but take a look at yourself too - and make sure you are not becoming one.
Considering writing a book on "Radical networking"
 nostr:note1z9nptms6lkvvt8m80mvsg0a9fpespyth0gtx2s350cds4uv73d8sdu9df5
Dude that is funny as fuck 🤣
🌐 Part 2 is out: If you're into cool graphs them you'll like this one
Article: https://deavmi.assigned.network/blog/ipv6_over_babel_part2/
#lora #rnode #ipv6 #babel
# Why?
Because in the [last post](https://deavmi.assigned.network/blog/ipv6_over_babel_part1/) we did it and now I want to continue working on it.
# What?
In part 1 we got setup with two RNode's running in their TNC (terminal node controller) mode. We were able to turn these into virtual networking interfaces that would appear on both $node_A$ and $node_b$ as `tnc0`.
## A new topology
What we now want to do is to introduce a third node, $node_c$, which will be placed into the following topology:

What we want to setup this time is the following:
1. Every node from $node_a \space ...\space node_c$ should be running an identical Babe configuration as we showed last time
2. $node_a$ must be in radio range of $node_c$
3. $node_b$ must be in radio range of $node_c$
4. There should be **no** radio overlap between $node_a$ and $node_b$. We don't want overlap as we want to force traffic from $node_a$ to travel _via_ $node_c$ in order to reach $node_b$ **instead** of going directly from $node_a$ to $node_b$.
## Hardware
For this we will be making use of the [LillyGo T3S3](https://www.robotics.org.za/development-boards/esp32-lilygo-boards/H596) for each of our three nodes:
 )
)
In terms of antennas I will be making use of [these](https://www.robotics.org.za/communication-wireless-Industrial/antenna-866mhz/YN-868MHZ-5DBI) antennas. They seem to perform rather well and are easy to mount on any surface that is magnetic - which will probably make testing easy for accomplishing the topology shown prior.
 )
)
# Setup
## TNC
Firstly, plugin each RNode and then run the following command. After each successive command unplug the current RNode and plug in the next RNode:
```bash
rnodeconf /dev/ttyACM1 -T --freq 868000000 --bw 250000 --txp 20 --sf 8 --cr 6
```
After this each RNode will be placed in TNC mode.
Next, let us start up our TNCs. Run this on each node:
```bash
sudo ./tncattach /dev/ttyACM1 115200 --ethernet --ll -vvvv
```
## Version of babel
For these tests we were using the `1.13.x` series. Anything where the the $x$ in `1.x.y` is different is incompatible.
You can build `babeld` with the following:
```bash
sudo apt install build-essential -y
git clone https://github.com/jech/babeld
cd babeld
git submodule init
git submodule update
make
sudo make install
```
## Babel
Firstly, let's revise what the Babel filter should be per each node. This should be saved to a file named `filter.txt`:
```
redistribute local ip 0.0.0.0/0 ge 0 deny
redistribute local ip fd00::/8 ge 64 allow
redistribute local ip ::/0 ge 0 deny
```
Now let us start Babel on $node_a$ and $node_c$ like this:
```bash
sudo babeld -d 5 -H 5 -c filter.txt tnc0
```
We start Babel on $node_b$ like this so that we can expose the control port which `babelweb` will use in order to get routing information from:
```bash
sudo babeld -d 5 -H 5 -c filter.txt -g 3001 tnc0
```
Let us also start `babelweb` on $node_b$ with the following:
```bash
./babelweb2 -static bweb/static/ -node [::1]:3001
```
We can confirm it is running by visiting `http://localhost:8080/` in your web browser.
# Testing
Let's begin testing.
## Assigning some addresses and _making some routes_
Let's assign the following addresses to the `tnc0` interface on each of our respective nodes:
1. $node_a$
a. `fd20::1`
2. $node_b$
a. `fd20::2`
3. $node_c$
a. `fd20::3`
b. Note: We don't need to do this for forwarding to work, the forwarding address used is the link-local one and that is used for link-layer (MAC) address resolution when constructing the Ethernet frame for forwarding
We can do this easily on each node as such:
```bash
sudo ip addr add
```
Yes, I am adding it to `lo` - it doesn't matter. The address just needs to be assigned to _some_ interface in order for it to be assigned to the host (and of course picked up by babel for advertising). **Also**, it is a full `/128` that will be generated. We are not doing any sub-netting at each router where hosts behind it are non-babel nodes - therefore this is perfectly fine for our use case. Our assumption is that each host _is_ also a router.
## Tests
Here we do some tests.
### Test 1
The antennas used were:
* $node_b$ long-pole
* $node_c$ long-pole
* $node_a$ magnetic-base
In this test I, $node_b$ (my laptop), was sitting next to $node_c$ and as we can see from the tests, it appeared that I had direct reachability to both $node_b$ and $node_a$:
 ){:height 379, :width 659}
### Test 2
The antennas used were:
* $node_b$ long-pole
* $node_c$ long-pole
* $node_a$ magnetic-base
Here I got up with my laptop ($node_b$) and then moved to the middle of the house, effectively between both antennas.
We can see a few things start to happen here. The neighbour relationship between my laptop ($node_b$) and $node_c$ stopped, the hellos being sent by either router were not being received. It is via this mechanism that reachability will drop every 5 seconds (when an advertisement is not received within the `hello_interval` then the reachability starts to drop at each time window):
 ){:height 362, :width 659}
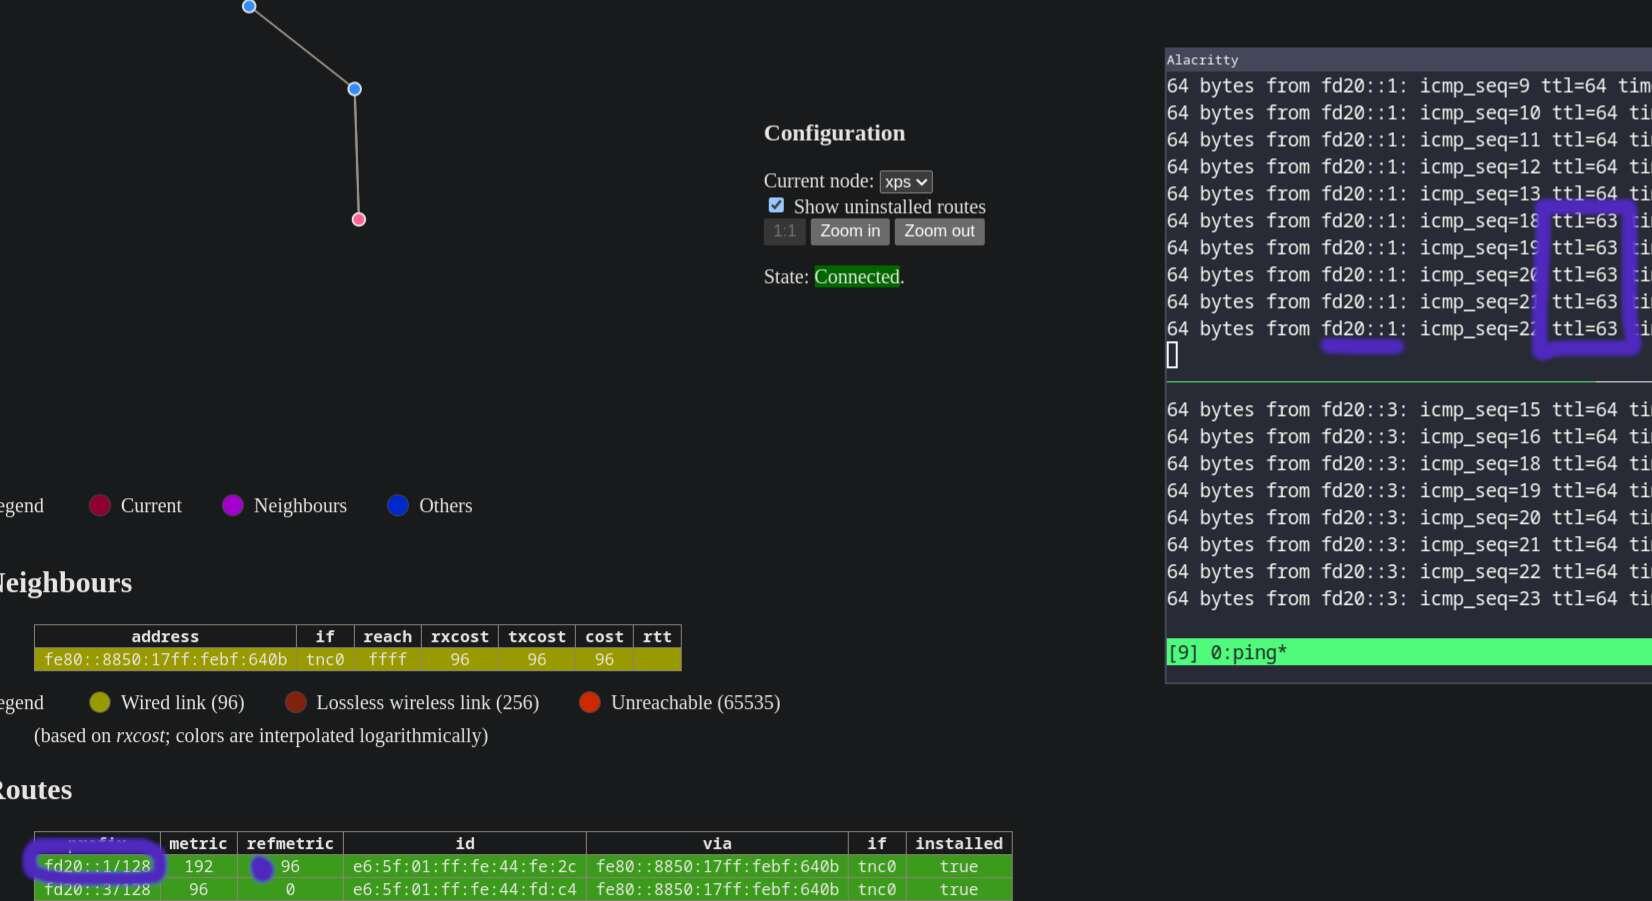
We can also see from above (and below) that the new routes for $node_b$ got installed. Meaning that in order for $node_b$ to reach $node_c$ it must first go through $node_a$. In fact we can see this here in the ttl values (purple ones):
 )
)
It seems the tests were a success! 🎊️
# Automation
## Startup executables
We can neaten up things a little to make our setup more automatic. By this I mean automating the startup of `tncattach` and `babeld`. This can be accomplished with a systemd unit (on SystemdD systems of course).
Create a file named `/etc/systemd/system/tncattach.service`:
```
[Unit]
Description=tncattach
After=network.target
[Service]
ExecStart=/usr/local/bin/tncattach /dev/ttyACM0 115200 --ethernet --ll
[Install]
WantedBy=multi-user.target
```
Create a file named `/etc/systemd/system/babeld.service`:
```
[Unit]
Description=babeld routing daemon
After=tncattach.service
[Service]
ExecStart=/usr/local/bin/babeld -H 5 -c /home/deavmi/filter.txt tnc0
[Install]
WantedBy=multi-user.target
```
Make sure to adjust any paths above including **binary executable paths** and **configuration file paths**.
Now run the following commands to start both services now and install them into their target - of which will be the target that runs on boot-up:
```bash
sudo systemctl enable --now tncattach
sudo systemctl enable --now babeld
```
## Automating addressing
Let's also have the IP addressing automatically configured.
On $node_a$ create a file in `/etc/netplan/lo.yaml` with the following:
```yaml
network:
version: 2
ethernets:
lo:
addresses:
- fd20::1/128
```
On $node_c$ create a file in `/etc/netplan/lo.yaml` with the following:
```yaml
network:
version: 2
ethernets:
lo:
addresses:
- fd20::3/128
```
As for $node_b$ (which is my laptop) I will not be automating it.
I do it because I am interested but also, donations are welcome:
**Monero:** `43jx2gRMRxBauz2gwKTb9VJyUqKNg7wVPVVhQd32cgUA6WGhs2haJXAHfrdTzTKdYfeGEbDT8FtkF45sKMAEyasWRSyG5Sj`
**Bitcoin:** `bc1qkvduq9rwray2ymrvkrven3m8vsp9ah55f4hnc4`
**Bitcoin (lightning):** `deavmi@minibits.cash`
# Why?
 )
)
Too many times stupid questions like these are posed by _weak betas_ - I will not entertain such silly questions.
I'm doing it because _unlike the detractors it's_:
* Fun
* You learn something
* I'm not a party pooper 💩️
# What?
Let's specify specifically what it is that we will be attempting today. In my previous blog post we got an IPv6 link working over LoRa using our RNodes and a program called `tncattach`.
## Where does babel fit in?
Once we have a working link over which IPv6 traffic can flow and of which the network interfaces on both sides have an IPv6 link-local address assigned, we can then make use of a program called `babeld`.
Say now you have a a few routes in your IPv6 routing table like:
 )
)
Now how would you distribute these routes to _other_ nodes? Well, that's exactly what Babel allows us to do. It runs as a daemon on all of your nodes you wish to have _receive_ routing information and also _distribute out_ (their) routing information.
## How?
We will be setting up an IPv6-routed network between two nodes, node $A$ and node $B$. We will then be able to have routes shared between these nodes via Babel, this should allow us to ping one another once the routing information has been successfully shared.
# Setting up
## Preparing our TNC
If you followed my second part blog post on setting up your RNode to be a TNC or _terminal node controller_ with `tncattach` then you will understand what the this part is about.
Firstly, ensure that your device is in the TNC mode with `rnodeconf`:
```bash
rnodeconf /dev/ttyACM1 -T --freq 868000000 --bw 250000 --txp 20 --sf 8 --cr 6
```
This is to be run on **all devices**.
We can now move onto the next section.
## Setting up our TNC
We now need to get the TNC up and running on both hosts, to do so we run the following command on host $A$ and host $B$:
```bash
sudo ./tncattach /dev/ttyACM1 115200 --ethernet --ll -vvvv
```
Note that we pass the `--ll` option. If you recall from our previous endeavour on getting IPv6 working over LoRa, this is a required option as it sets the MTU to a value of 1280 if it is not already greater than or equal to that value. This is important as on Linux such a constraint on the MTU is required if IPv6 is to be enabled on the interface.
Running `ifconfig tnc0` on host $A$ now we get:
```
tnc0: flags=4163
inet6 fe80::6481:dfff:fec1:ec6c prefixlen 64 scopeid 0x20
ether 06:0d:f2:a1:72:16 txqueuelen 10 (Ethernet)
RX packets 460 bytes 49615 (48.4 KiB)
RX errors 0 dropped 0 overruns 0 frame 0
TX packets 795 bytes 129308 (126.2 KiB)
TX errors 0 dropped 0 overruns 0 carrier 0 collisions 0
```
Note: This link-local is for illustration purposes **only**; it changes later on as I tore down the `tnc0` interface a few times
And on host $B$:
```
tnc0: flags=4163
inet6 fe80::88c:65ff:feac:5a7 prefixlen 64 scopeid 0x20
ether 0e:33:83:f5:61:88 txqueuelen 10 (Ethernet)
RX packets 749 bytes 115611 (115.6 KB)
RX errors 0 dropped 0 overruns 0 frame 0
TX packets 831 bytes 299501 (299.5 KB)
TX errors 0 dropped 0 overruns 0 carrier 0 collisions 0
```
Note: This link-local is for illustration purposes **only**; it changes later on as I tore down the `tnc0` interface a few times
Therefore we can see the following IPv6 information:
1. host $A$ has an IPv6 link-local address of `fe80::6481:dfff:fec1:ec6c`
2. host $B$ has an IPv6 link-local address of `fe80::88c:65ff:feac:5a7`
This means that we have the necessary configuration setup to continue on setting up Babeld. This is because of two things:
1. We need IPv6 working on the interface as that is what we plan to _use_ over the network
2. Secondly, Babel requires IPv6 link-local addresses (and IPv6 in general) in order to send out link-local multicast traffic for the purpose of beaconing and finding other routers on the same network segment. Along with this it also will install routes with the next-hops being that of the corresponding IPv6 link-local address of the neighbouring router.
## Setting up babeld
`babeld` is the routing daemon that implements the [_Babel routing protocol_](http://www.irif.fr/~jch/software/babel/), it's available on almost all Linux distributions these days (including OpenWRT) and is relatively easy to setup.
Recalling that babel is here to help us redistribute routes. Well, we have some questions then:
1. Which routes (from our kernel table) in particular should we redistribute?
2. Should we generate `/128` (or `/32` for IPv4) routes based off of addresses assigned to interfaces?
All of the above (and more) can be controlled via the Babel configuration file.
Firstly, Babel will _by default_ scrape off **all** interface addresses and export them as `/32` routes (for IPv4) and `/128` routes (for IPv6). There isn't a problem really with the latter as that is what we want. However, I know for sure that on my host $B$ it has quite a few IPv4 addresses ob various Docker container `veth`(s); therefore on host $B$ let me add this line:
```
redistribute local ip 0.0.0.0/0 ge 0 deny
```
The `local` keyword refers to the _local address_ redistribution technique described a moment ago.
We then say, any route (the candidates in this case would only be `/32` and `/128`s because of the `local`) which when the mask of `0.0.0.0` (hence the `/0`) is applied to it _equals_ `0.0.0.0` (the network address) will be allowed **if further** it is a route of prefix length 0 or greater. This effectively means all IPv4 `/32` routes will not be redistributed and only those derived from interface addresses.
Note: There are other more general way to do this for kernel routes and device/local-address routes using the `out` filter but this is easiest for now.
Note, we are about to add more filters. The way it works is top to bottom. If a route is matched then we stop there, apply the action (`allow` or `deny`) and we do not run the filters that appear after/below it.
Now on both hosts I will be assigning addresses to them which we will use for the tests, these addresses will be in the `fd00::/8` range. Meaning that the first 8 bits of any route must equal `fd`. Since I have _other_ IPv6 addresses on host $A$ and $B$ which I don't want to be part of the test we should filter those too:
```
redistribute local ip fd00::/8 ge 64 allow
```
But remember, all that does is match `fd00::/8` routes, any _other_ IPv6 route would not match that clause and by default would have the action of `allow` applied to it. Therefore we must add a rule that will definitely catch remaining IPv6 routes and apply an action of `deny`:
```
redistribute local ip ::/0 ge 0 deny
```
Save the above into a file called `filter.txt` so we can access it later.
Now that we have that setup we can run the `babeld` command:
```bash
sudo babeld -H 5 -d 5 -c filter.txt tnc0
```
The parameters are as follows:
1. `-H
a. The hello interval. This is how frequently the daemon should send out announcements.
b. It must be **the same** across all nodes.
2. `-d
a. Sets the verbosity of the debugging output
b. I set it relatively high so that I can see what is going on at every step of the way
3. `-C
a. This contains the path to the file containing our Babel configuration.
b. Hence the `-C filter.txt`
4. `[interface list...]`
a. The list of interfaces to run the Babel routing protocol on.
b. Here I have just selected `tnc0` as I only want to run it over one interface.
On host $A$ I am adding the extra flags _before_ the interface list:
```bash
-g 3001
```
This runs a debugging port in _read only_ mode (use a `-G` for write access as well) on `3001`. This will aid us in running a diagnostics tool called `babelweb2` which will let us analyse the state of our Babel network from the point of view of node $A$.
## First test
On host $B$ let's add an address of `fddd::2` to _any_ interface, let's say `lo`:
```bash
sudo ip addr add fddd::2 dev lo
```
Now on host $A$ if we look at _BabelWeb_ we should see it:
 )
)
We can also see the route we learnt of `fddd::2/128` via our `tnc0` interface:
 )
)
Show also that the _via_ (next-hop) is a link-local IPv6 address. This is used to make an ICMPv6 neighbour request to ask for the MAC address at that host to then put the IPv6 packet destined to it inside of an Ethernet frame destined to said MAC address.
On host $A$ lets now assign an address of `fddd::3` to any interface, let's say `lo`:
```bash
sudo ip addr add fddd::3 dev lo
```
Likewise on host $B$ we would see a route to `fddd::3/128` via our `tnc0` interface:
 ){:height 464, :width 689}
We can even open up Wireshark on host $B$ and attach it to network interface `tnc0` and see we are receiving Babel announcements over IPv6 link-local about routes. Here we can see host $A$ advertising us its route to `fddd::3/128`:
 )
)
Now if we are on host $B$ we should be able to ping `fddd::3` as it will have a route installed to it:
 )
)
That is rather reasonable latency too!